

Proper Care of your Hoverprobe
by Niña Muñoz
published: August 8, 2022
Here are some probe care suggestions:
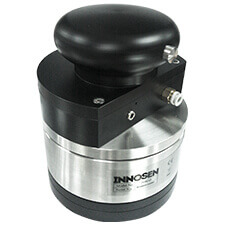
Hoverprobe
1) If using a metal test table
Ensure the table is electrically earthed. It has been found that unearthed metal tables can cause variability in the readings.
2) Parking the Probe
To keep the probe tip in the ideal condition, the Hoverprobe should be parked on a clean, hard surface. This keeps the probe tip fully compressed and ready for measurements.
3) After Fitting a New Probe Tip
After fitting a new probe tip, the Hoverprobe should be parked on a hard surface for at least 45 minutes before use. The reason for this is that when a new probe tip is fitted, it will slowly deform from the pressure. This deformation changes its measurement capability.
Spare packs of probe tips are available from Innosen.
Innosen highly recommends changing the probe tip every 4-6 weeks in order to obtain precise measurements.
4) Clean Air Supply
The Hoverprobe air bearing is susceptible to more rapid wear from contaminated air supplies. Fitting a filter/regulator prior to the Hoverprobe can easily prevent undue deterioration. The air supply should be a maximum 5 bar (70 psi), free from oil and filtered to 5μm. Cleaning and regular replacement of the probe tip ensure maximum performance.
Probe Tips, Problems, Prevention and Solutions
There are three main types of probe tip deterioration. Below we explain each problem, offer preventative measures to avoid the problem, and advise on how to solve each problem if it does occur.
1) Physical damage – This is the most common source of probe tip deterioration. Compression due to weight makes the probe tip bulge slightly at the bottom (it becomes mushroom-shaped), which alters its surface area and, therefore, the readings are taken. Wear and tear due to contact with cans or sheets will also reduce measurement accuracy.
Preventative measures – Improve handling procedures.
If the problem does occur – Visually check the tip (this should be done regularly)
and replace it if any sign of physical damage is seen. Look especially for flattening or compression of the tip. Innosen recommends tip replacement at monthly intervals.
2) Dirt and grease – Particles of grit and the gradual build-up of a film of grease are both conditions that will negatively affect readings. Grit particles can even prevent the gauge from measuring at all. They may also damage the test sheet by scratching the surface.\
Preventative measures – Do not rest the probe on a greasy or dirty surface.
If the problem does occur – Cleaning is simple. Place a sheet of clean plain white paper under the Hoverprobe or between the callipers of the Formed Can Probe and pull the sheet out by hand. This removes all surface grease and particles.
3) Carbon leaching – Carbon particles are lost from the tip over time as it is used, which then changes the conductivity of the tip. This is a gradual process and one which cannot be detected readily by visual inspection.
Preventative measures – Replacing probe tips at a minimum of monthly intervals. In situations where the probe is in almost constant use, tips may benefit from being replaced at weekly intervals.
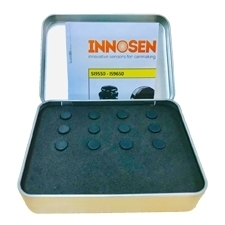
If the problem occurs – You may not know it! Carry out regular cleaning and tip replacement. A pack of 12 tips plus fitting instructions in a metal storage container is available from Innosen.
Why is Probe Tip Integrity Important?
An essential part of maintaining the world-class performance of the Coating Thickness Gauge – whether you use it with the Hoverprobe or the Formed Can Probe – is regular checking and cleaning of the special probe tip and at least monthly renewal of the tip. If damage occurs, renewal may need to be brought forward.
Why is this? Gauges of this type measure the differences in electrical capacitance between a reference sample and sheets or cans to be tested. The probe tip forms an essential part of the gauge because its surface area forms a key part of the calculation of film weight.
Probe tip settling time – important for new tips
Newly fitted probe tips should be left under pressure for 45 minutes before calibration.
The surface area of the probe tip plays a big part in the measurement process as its surface area is a key component in the thickness calculation. In use, the probe tip is compressed, and it expands thus creating a larger contact surface area. Tests have shown this expansion stops in 30-40 minutes after which calibrations and readings will be very consistent. Clearly taking readings or calibrations while the tip is compressing will result in variable results.
The Hoverprobe and Formed can probe apply a constant force on the probe tips resulting in consistent probe tip surface area. It is important that the Hoverprobe is parked on a hard flat surface when not in use as this ensures the tip remains compressed.
Probe tips
Replacement tips are available from Innosen.
Hoverprobe IS9650
Test coating thickness on flat sheets with world class R&R.
OFFICE
Spain
Romà Piera i Arcal, 8
08330 Premià de Mar (Barcelona)
Spain
Multilingual Main Tel:
+34 937 549 526
Email: [email protected]
Hong Kong
11th Floor Dah Sing Life Building
99 Des Voeux Road Central
Hong Kong
Tel: +852 2127 0699
Philippines
808 Citystate Centre Building
709 Shaw Boulevard
1600 Pasig City
Philippines
Tel: +63 2 8696 6965 /
+63 2 8696 6978
USA
7691 N.Overland Trail
80524 Fort Collins
Colorado
USA
Tel: +1 970 305 8721